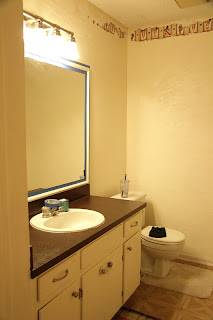
So begins the unplanned remodel. Because it's grown from even there. Here is a before shot of our hallway bathroom, as used in our real estate listing:
See that blue countertop? Ugh. Original to the house....1979, baby. Oh, and here's a close up of the unfortunate border:
(Sorry for the terrible color balance...) I make it a habit to pretty much loathe wallpaper. It's just so 1985. The only reason there is a border to begin with is because there was a border when we bought the house (it was even uglier FROGS!) and a very detailed faux texture finish on the wall, which stopped at the bottom of the border. So if I had just taken down the border and painted the wall to the ceiling, there would have been an invisible border because there's no texturing up there. For some reason, I decided to do a patriotic bathroom (I'm still not sure why) and that brings us to today.
Now I'm still faced with the no-texture-to-the-ceiling dilemma, but I think I've found a great way to solve that without having to choose another traditional wallpaper border that I'm just going to be sick of in four months. But that's not for this post.
I found a couple of options for painting the countertop, spray or brush...and given my current love of spray painting everything I can find, I chose that option. I am using Rustoleum Stone Textured Finish paint in Stone Mineral Brown. So after taping down plastic and newspaper everywhere, I applied a primer in a sort of reddish brown (because it was either that, gray or white...) before I began painting the stone. It took about 5 coats of the stone paint to cover the red primer completely, which was roughly one and a half cans.
 |
| See the texture of the stone? It's not smooth, it's a rough finish. But I think that makes it look more realistic. |
Last night I applied my first two coats of polycrylic waterproof sealer, and today throughout the day I will apply more and probably finish with 4-6 coats of sealer. I will say that I sort of preferred the look of the stone finish while it was matte, and the sealer is a semi-gloss so it is now shinier. I didn't even pay attention to whether or not they had the sealer in matte. But it's too late now so I can definitely live with that.
So this is where we are right now. I taped around the frame on the mirror because I will also be painting it, either dark brown or black. The wallpaper is almost gone, and now I need to go get busy to get started on the new border solution. More to come!


1 comment:
Excellent! Not to make more projects for you but our neighbor down the street when we lived in Cove also painted her bathroom floor which was linoleum. Looked GREAT!
Post a Comment